Wednesday, June 24, 2009

Work on it Wednesday

Wednesdays are days for accomplishing things. It's not drag-yourself-out-of-bed-Monday, it's not TGIF, it's not a funfilled weekend. It's a no-excuses-gotta-get-something-done day.


So today, I'm working on one of the advent calendars. Not scrapbooking, all the little pieces in felt is very scrapbook-ish. My current step of the project is to sew on all the numbers to the pockets.


For those of you that don't know what I'm talking about, I'm making 2 advent calendars for my nieces. They are felt with pockets that have hand-cut felt numbers on them. Each pocket has some type of embellishment on it (buttons, crystals, applique, etc) as well. All the embellishments have been attached at this point, but I'm only up to sewing #7 so far with the numbers. I'm doing all the numbers with a blanket stitch, so it's easy to do in front of the tv, on the porch, in the living room, or where ever I might be. It's not hard, it's just a LOT of little steps to complete this gift. The idea is that we will give the advent calendar as a gift this year, and then next year, send 25 little packages to fill the pockets. I'm hoping it will be a fun way to get closer to these 2 little girls that I don't get to see very often.


Here's a sneak peak:


So, what are you working on today? Getting anything done? Feel free to leave a comment about what you're working on if that will help you be more accountable to actually getting it done!

Happy scrapping!
HeatherQ

Tuesday, June 23, 2009

Tuesday Tip - free classes online

Ah, summer. It's a whole different mindset, isn't it. Somehow at our house, we manage to pack more activities into the summer than any other season, and yet it feels more relaxed. I suddenly seem to have time I want to fill up with fun. Are you feeling that way? Need something good to fill some time this summer?


Tuesday Tip -- Free Classes online


Photo editing: I just signed up for a free class from Jessica Sprague. You can, too! Check it out!


Other places to find free online classes:

Two Peas in a Bucket has several classes available, including topics like photo editing, using sketches, making cards, and more!

Big Picture Scrapbooking has a few free classes, including summer photos, all about me, and intro to digital.

Scrapbook.com has two free classes. Topics are techniques and elements/design.

HP has lots of free digital photo classes on their site, from beginner to advanced, including a Photoshop Elements 7 class!

Get it Scrapped (with Debbie Hodge) has a fun little lesson on doodling for free. I tried it and did all the little doodles. For me, it was a lot of fun and I wish I could afford to take the rest of the lessons!

Get it Scrapped has more classes HERE with topics like scrapping everyday life, page parts, you, travel, and more.


I know there are TONS of classes out there to pay for that are well worth the money, but in this economy, it's hard to afford them. I've got a wishlist of the one's I'd take if I won the lottery! These free ones can certainly keep me busy for a long time.

Do you know of any other free classes? Post them in the comments and share!

Happy Scrapping!
HeatherQ

Monday, June 22, 2009

Monday's Moment

I got this idea from Ali Edwards's blog today.

Monday Moment

Outside my window... my tomato plant has blooms on it! I'm very excited!!

I am thinking about... my NEW HOUSE! (We're supposed to close on it on Friday. Hopefully this will go smoothly.)

I am thankful for... free classes. At Home Depot, online from Jessica Sprauge, and other blogs.

I am wearing... capri pants and a short sleeved top.

I am creating... Christmas presents for my nieces. I know, it's June, but I want to be ahead of the game this year!

From the Kitchen... chicken, pesto, pasta, veggies -- somehow put all together.

I am going... to go back to school for my master's degree.

I am reading... book 3 of the Twilight series.

I am hoping... that I'll be able to convince my husband that my method of moving into the new house is the "right" one. :)

I am hearing... the tick of the clock, reminding me that I need to get things done today!

Around the house... there's a funny smell coming from the kitchen. Must be the dishes and the garbage that both need to be taken care of. Guess that's what I'll be doing next... ugh.

One of my favorite things... CSA shares, fresh from the farm veggies!

A few plans for the rest of the week... blog more, contact my university advisor regarding my transfer credits, close on the house, interior paint class at Home Depot, pack some boxes, sew some more on the gifts for my nieces, bake Kale Chips, and go back to the farm on Thursday for more!!

A picture to share... this is the BACK of the new house. We don't own it yet, and I don't have a good picture of the front yet... I don't know how I missed that, but oh well. I'll get a good picture of it soon!!

Saturday, April 11, 2009

My One Little Word -- Finally!

So, I picked my One Litte Word (for 2009) way back at the beginning of January. I kept forgetting about it though, which is bad considering my word choice! I chose the word...

ACCOMPLISH

I decided that I needed to make a constant reminder for myself, so I made this:


and hung it on the wall in my crafting space. I hope it'll be that constant reminder to Accomplish everything I hope to do this year!
Just had to share! Did you pick a One Little Word for this year? Check out Ali Edward's blog post for a description.


Happy Scrapping!

Tuesday, March 31, 2009

Tuesday Tip -- Page Planning organization

When I go scrapbook somewhere else, I love to have my pages pre-planned with coordinating paper and embellishments ready to go. Then I can bring only 1 bag and my tool caddy into the crop. I've been amazed at how NICE this has felt lately!! See, I used to be the kind of cropper that would bring EVERYTHING I could fit in the rolling tote, plus 2-3 bags/boxes, etc. It often took me more than one trip from the car to get everything into the cropping space. And then it took me so much time to unpack (and then pack up at the end) that I lost valuable cropping time.
So, a few years ago, I decided I needed to be better organized for my cropping time. I looked around and found these great tools from Cropper Hopper. Now I can unpack and clean up in less than 5 minutes and carry everything in one trip easily. It makes my cropping time so much more productive and gives me a chance to actually finish a lot at the crop for all those "oohs and ahhhs" from the people sitting near me. Plus, if I don't finish a page, I put everything back in the organizer and it's ready to go next time I scrapbook, and with the card


Tuesday Tip -- Page Planning Organization


There are 3 pockets:
One small pocket in the front for photos and page planning cards.


One medium sized pocket in the back for
embellishments, stickers, accent papers, photos, etc.

One large pocket in the middle for your 12x12 paper and large items.

Then you have the page planning cards, too! I love these -- they are roughly 4x12 inch cards that are folded in half to fit in the front pocket. There are spaces to jot notes about your page plan, including title ideas, supplies needed, page size, sketches, journaling notes, color schemes, etc.


Now for the price saving tips...


I love the cropper hopper ones and have many of them. They are so sturdy and have the perfect sized pockets. But, I couldn't afford them many of them when I first started using them. I started with just a few to see how they did it. Then I took some 12x12 page protectors and put a 6x6 page protector inside. I was able to separate the big pieces from the small ones and photos. Then I printed a bunch of my own version of the planning cards onto 8.5x11 cardstock.


I really prefer the cropper hopper style because they're sturdier than a page protector and the pockets don't get lost inside like smaller page protectors do, but the page protectors will do in a pinch (or a down economy).


Happy Scrapping!
Heather Q
Tuesday, March 24, 2009

Tuesday Tip -- more money available for scrapbooking

I've been trying to squeeze the budget lately. There's little money for scrapbooking, but there's all kinds of stuff I want!

Tuesday Tip -- more money available for scrapbooking

Have you heard of The Grocery Game? In our area we also have Savings Angel.
Both of these sites help you manage your grocery purchases and coupon usage, but for a fee.

Coupon Mom does this for free, but with fewer services and not as detailed. I use this site.

The whole trick is to clip you coupons and use them at the optimum time. I cut out the ones that I know we would use. Then, I wait until the item goes on sale and use the coupon. As long as I don't NEED it, I can wait. I saved $92 on my last grocery bill and $95 on the one before that. This includes food as well as cleaning supplies, paper goods, and pharmacy items.

Let me give you an example. I know we will eventually use the boxes of rice that actually cost me 25 cents each. They were on sale at the store, buy 2 get 2 free, plus I had a coupon for $1 off. All four boxes for a buck!

I bought a "Warm Delights" for free. The store sale was 10 for $10. I only bought one (would've been $1) but had a coupon for a dollar off. So it was free!

I bought boneless ribs in the family pack because coupon mom pointed out the great savings. I got 5 pounds for $5 and ended up making several meals out of it!

I highly recommend the free Coupon Mom site. See if any of the stores in your area are on the list.

If your store is not on the lists at any of the sites, you can use the same concept at your own store. Clip coupons for things you'll use and put them in a coupon organizer (or a set of envelopes you've clipped together). When you're at the store, if it's on sale and you have a coupon, stock up. If it's not on sale and you don't NEED it right now, save the coupon for another day. Look at the family packages of meat and freeze in smaller portions.

With all the money you save, you'll be able to get that ______ you NEED for your next scrapbook project! I had a great time shopping at a Scrapbook Garage sale this past weekend and found all kinds of deals. I wouldn't have been able to go if I hadn't saved some money at the groceries this month!

Happy Scrapping!

Tuesday, March 10, 2009

RAK Winner! and Tuesday Tip -- Pen storage

Congratulations to the winner of last week's RAK

Wannabescrappin said...
I love finding new blogs to follow! I saw yours in one of your e-mails for the LOM Yahoo group.
March 8, 2009 6:08 PM

Please email me at TheScrapTrap@yahoo.com with your mailing address!

All of you that signed up to follow my blog, add some other blogs to your following list. If you used blogger you can go to your "dashboard" and see updates, rather than going to each blog to see whether they've posted or not. I used to have a list I checked every day, but so many didn't post every day. Now I just check the one place. I'm so happy with blog following -- I hope you'll all find it helpful, even if you decide to quit following me! :D (But none of you will want to do that!!!)

Tuesday Tip -- Pen Storage

I've heard from multiple sources that the key to a pen/marker's long life is to store it horizontally. I used to use a pen caddy that held 75 pens on a collapsible stand (I think the one I used was from Cropper Hopper). I out grew that one years ago, and have been keeping all the other pens in a large zippered pouch, also by Cropper Hopper. This was so frustrating because I could never find the pen I wanted and had to check multiple locations for pens. I finally decided to change my system and make it more user friendly!

I spent a whopping $6 on a set of 5 plastic drawers at Walmart. Each drawer is sorted by colors.

Drawer 1 = Red, pink, orange
Drawer 2 = Yellow, green
Drawer 3 = Blue, Purple
Drawer 4 = Brown, Black, White
Drawer 5 = Metallics, Red Eye, Disappearing ink, and other specialty pens


(this is my "specialty pen" drawer)

It can now sit on my desk, I can easily reach it, AND I can find the colors I need FAST.


Bonus Tip:


You may be wondering about how a "prudent" scrapbooker can have so many pens. A great tip I got years ago -- Michael's sells a 100 marker set in their ARTISTS section (like by the paints and canvas -- not the craft paint). My pens say Fibracolor on them. They were $15 regular price when I bought mine 6 or more years ago now, and they all still work beautifully! I used a 50% off coupon to buy them during one of the holiday sales, so it cost me less than $8 to have every color of the rainbow. I'm pretty sure they're still available -- I saw them within the last year, but don't know how much they're selling them for now.


I love the look of "creative lettering" on my titles and journaling. When I go back and look at my older pages, I love the look! It makes me happier than alpha stickers, stamps, rub-ons, or even computer printed.


Hope this post gave you lots of helpful tips tonight!

Happy Scrapping!

Tuesday, March 3, 2009

Tuesday Tip -- RAKs and Prizes

I have been very fortunate lately. I've won several great prizes and RAKs. For this Tuesday Tip, I'm going to share my secrets and Pay-It-Forward as well!


Tuesday Tip -- RAKs and Prizes


Increase your chances of winning by:


1. Following blogs. I am regularly updated by my "Blogger Dashboard" on all my blogs. It gives me a title, a picture, and a few lines from each blog. I click on the ones that interest me. I never miss a RAK by my favorite bloggers that way! Plus, I don't miss the announcement that I've won. I can't believe the number of times I've seen on a blog that someone won, but didn't claim the prize. The "Blogger Dashboard" is free and simple to use, but I'm sure there are others out there, too. You can follow just about any blog by copying and pasting the address into your dashboard, but some blogs (like mine) also have a "follow me" button for one-click service!


2. Join Fiskateers! I know most of you who come here regularly are from Fiskateers, but if you're not, you really need to join us! I know it's a little intimidating to have to send an email request to one of the 5 women who host the board, but it's not a big deal to join. It's just a way to protect their site. Fiskars and the Fiskateers are so generous! Come see what we're all about! http://www.fiskateers.com/


**And now, for my own RAK!**


I'm sending one lucky blog reader this package of items. (Sorry, due to postage, this whole package can only be sent to US or Canada blog readers. If you are from another country, I will still send you a small prize if you are the winner, but it will not include all the items shown.)


Prize includes:

6x6 Scalloped Chipboard Book by Colorbok (US and Canada only)
18 sheet Mini Paper Pad by Colorbok
Self-adhesive Rhinestones
Heidi Grace Flower Brads Orchard Collection (US and Canada only)
Heidi Grace Rub-ons (US and Canada only)


Here's how to win:

1 entry for commenting on this blog post. (limited to one comment/person)
1 more entry for "following" my blog publicly - make sure you tell me in your comment!!
1 more entry for sending someone else to my blog -- they must include your name in the comment section (so-and-so sent me)


You may enter anytime before Monday, March 9th at 7:00pm, Eastern Time Zone (US). Winner will be announced with next Tuesday's Tip. I reserve the right to "re-RAK" if the winner does not respond within 2 weeks of announcement.

Happy Scrapping!

Tuesday, February 24, 2009

Tuesday Tip -- Straightening Ribbon

Well, it's only Tuesday for 15 more minutes where I live, but I just might make it!

This weekend, while cropping at a friends house, I was reminded of an awesome tip for ribbon straightening.

Have you ever found yourself frustrated because the ribbon you want to use looks like this?


Tuesday Tip -- Ribbon Straightening

There are several easy ways to flatten out the kinks in your ribbon.

1. Water -- wet it down, then hang it over something to dry. It takes a long time, but it's very frugal.

2. Xyron -- run it through your Xyron machine to coat the entire back side of the ribbon with adhesive. (Not always truly effective, but it is quick.)

3. Iron -- get out your big clothing iron. (Who wants to pack that in their cropping tote?)

4. Buy one of the mini irons out on the market.

5. My favorite: Curling Iron!!! This works great -- especially if you put the ribbon through slowly, with the kink facing opposite the curve of the curling iron. I happened to have an extra in my linen closet, but my friend Chris bought hers at a garage sale for 50 cents!! Can't beat this tip for prudence -- inexpensive, easy to handle and store, quick and very effective!


Happy Scrapping!

Thursday, February 19, 2009

My Start Here Jar Tag labels

So many people have asked what I have on my tags for my Start Here Jar.

From Stacy Julian's book, Photo Freedom, I used:

1. All About Us
2. People We Love
3. Places We Go
4. Things We Do
5. Storage Albums
6. Theme Albums
7. Photos I Love
8. & 9. Digital Triage

(I did not use Family Words File or Cultural Memorabilia Box because I'm not doing those two components at this time.)

I added these labels of my own:
10. Sort photos (just getting started with LOM, so I have lots of photos to put into all the binders, drawers, and cold storage)
11. Sort paper and scraps (I always have paper and scraps to put into my organizational system and I procrastinate on getting this done.)
12. Sort ScrapRack (I always have items that need to be put into my ScrapRack system. I have a basket I throw that stuff into when I get it until I feel like putting it away.)
13. Sketches Binder (I save printouts of sketches in a binder (see previous post) and need to constantly update my binder.)

I also do other crafts besides scrapbooking, so I added these labels as well:
14. Make a card
15. Knit
16. Sew

So, now when I sit down at my desk and don't know where to start, I've got a tool to help me! Glad to hear so many of you are enjoying it! I was so bummed last week that I was too sick to get it done.

I get to go scrapbooking at a friend's house for the weekend, but I just got Photoshop Elements 7, so I'm more excited about organizing my digital photos. I have 5 years of photos stored digitally that I haven't printed yet because I already had so many photos I was "behind" on. I kept saying that I'd print out the new ones as I preplanned the pages for them... but now I just want to print them out using Stacy's method. I've got them all backed up, but not organized at all! So, I think I'll bring my laptop and spend some time doing digital triage this weekend.

Happy Scrapping!

Tuesday, February 17, 2009

Tuesday Tip -- Start Here Jar

Thanks to everyone who sent wishes for good health. I got diagnosed last week with bronchitis. It hasn't been fun -- still coughing and exhausted. Now, though, I've got medication, so it's slowly getting better.

Tuesday Tip -- Start Here Jar

Have you ever sat down at your space and thought "Where do I start?" or "What should I work on today?" Have you ever felt overwhelmed? Have you ever avoided your space because you're not sure what you could or should work on?

I've recently read Stacy Julian's book Photo Freedom and am starting her Library of Memories (LOM) system of organizing photos. In her book, Stacy talks about using a "Start Here Jar" full of popsicle sticks with one activity for her system written on each stick.

Well, I didn't like the look of popsicle sticks. I thought that if I created a jar with the sticks, I wouldn't be inspired to use it. It would just clutter my desk instead.

So, I decided to throw my own twist into it. Take a look!

I bought flowers on sale at a craft store and cut them apart. Then I tied little tags from the Heidi Grace Love Blossoms line onto each flower. The tags all have activities on them, but I added extras that weren't on Stacy's list for some of the other activities I could work on in my space.


I searched all the stores for an inexpensive vase or jar to put them in and finally decided to use the pewter pitcher I have from my grandmother. It's one of those things that holds a lot of memories for me. I remember every time we went to Grandma's, she poured milk from that pitcher. She never put the carton on the table. The pitcher was on the table for every Christmas dinner, Easter breakfast, and Saturday lunch. I always thought it was such an elegant thing to do. When she passed away and Mom asked if there was anything I'd want to remember her by, I thought of the pitcher right away. So, it's been sitting in a cupboard, waiting for the "perfect" way to display it. I think I've found it now! See, Grandma was a scrapbooker back before scrapbooking was such a mainstream hobby. She saved greeting cards, letters, newspaper clippings, and all kinds of things. Her albums are now in a museum. I love having this pitcher decorating my scrapbook space, in such a functional way.


When I've done the activities on the tags, I move the flower into the second vase, "Accomplished." My One Little Word this year is "Accomplish" because 2009 is the year I want to get things done! Often I have great ideas, but don't follow through and finish. That's my goal this year and the word I've chosen to keep me on task.

All in all, I spent $4 on flowers and used everything else from my existing supplies. Not bad for a decorative item that's going to motivate me!!!

Happy Scrapping!


Wednesday, February 11, 2009

sorry -- no tuesday tip this week

I'm miserably ill this week -- fever, cough, congestion, exhaustion. I'll be back next week with a great tip, though! I can't wait to show you, but I couldn't get it done in time for this week's tip. Off to refill the water bottle -- you know, fluids and rest!

Tuesday, February 3, 2009

Tuesday Tip -- Sketches organization

Do you use sketches to scrapbook? Do you cut them out of magazines? Print them from websites? Search for them in galleries? Draw your own? Purchase books and books of them?

I do all of the above. And I have a great binder full of sketches to go to when I'm ready to plan my pages. But, then I get overwhelmed by all the choices!! So, I found a way to organize what I have. This isn't really my idea -- my friend Chris does this and passed it on to me. I tweaked her idea just a little.

Tuesday Tip -- Sketches organization

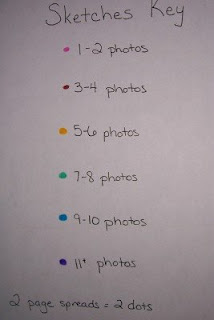
I put all my sketches in a 3 ring binder. I don't bother to sort them by date, creator, or anything else. I just put little colored dots (drawn with a marker) in the bottom corner of each sketch. On single pages, there's one dot. On 2 page layouts, there are 2 dots. The dots are color coordinated by number of photos. (pink for 1-2 photos, red for 3-4, etc)
When I'm planning pages, I look at how many photos I have and search for sketches with that color dot at the bottom. When doing 2 page spreads, I can either look for the 2 dots, or I can divide my photos between the pages and then look for each page separately.

Here's a picture of my "Sketches Key" at the front of my binder.


The actual sketches pages are copy written, so I can't post them here, but I can tell you some places you can find some.

I'm sure you know of more!! Post them in the comments -- I can ALWAYS use more sketches!!

Tuesday, January 27, 2009

Tuesday Tip -- bargains and scraps

I wanted to share a project I FINALLY did this week!! I've owned this kit for over 3 years. I bought it at Joann's at their "after Christmas sale" for 75% off and it has since lived in 3 different homes with me, still in it's box. Yes, I moved this thing twice!!

Tuesday Tip -- bargains and scraps


This tray was part of a kit from "Gallery J" by Colorbok and it was meant to be a cookie tray for Santa. I decided I didn't really like the papers that came with it, and with no kids in our house, I don't leave cookies for Santa. So, I used some papers from My Mind's Eye that I've had for months. This way it's a tray I can use at any season! So, keep your eye out for great deals! You can always adjust kits to fit your needs! Check those clearance aisles, the discount stores, and the warehouse-y places. There's all kinds of great stuff that just needs a little creative tweaking.

My second tip has to do with using your scraps. I often hear people say that they save all their scraps, but then never use them. If you look at the side of my tray, you'll see I used some scraps with the Fragments that Tim Holtz came out with.
It takes just a tiny piece of paper under a fragment to really spice up your project. He's got several sizes and shapes of fragments out there. Next time you think you have too many scraps, try using some of them up under a fragment. (Attach them with "glossy accents" for a clear adhesive that really holds well.) You can see more of Tim Holtz's fragments in action on his blog http://www.timholtz.typepad.com/ He's got samples of them all over, so look through his blog posts and his catalogs. You'll see some really cool tutorials and videos with GREAT ideas!

Happy Scrapping!


Wednesday, January 21, 2009

Tuesday Tip -- Game (a little late)

I know it's Wednesday, but I had a migraine yesterday and just couldn't get this tip up before the end of the day. But it's still a good tip!!

I was chatting with a friend on the phone one day and we were complaining about how we have all this scrapping stuff that doesn't get used. Either tools we HAD to have, or embellishments that we bought by the hundreds in every color they manufactured. We decided we needed a challenge to get us to use these things in our scrapbooking. Plus, I needed a challenge to get me to complete more projects (I have a tendancy to scrap VERY SLOWLY).

We came up with...

Tuesday Tip -- SCRAPBOOK BATTLESHIP


You'll need a friend to play with you!

Step one: Make your gameboard.
Make an 10x10 grid for a total of 100 spaces.
Label the columns with letters and the rows with numbers.
Fill in each space with a project, embellishment, tool, or technique.
Make 2 copies!!

Step two: Exchange and place the boats
Give your friend one of the copies and get a copy of theirs.
Place the "boats" (I outline the spaces to show where the boats are).
5 boats: 5 spaces, 4 spaces, 3 spaces, 3 spaces, 2 spaces
Keep it secret! Don't let your friend see!

Step three:
Now start scrapping and using those tools, embellishments, and techniques.
Tell your friend when you've completed one (I did C4 -- Coluzzle).
Your friend needs to check to see whether you "hit" a ship or "missed"


We exchange prizes for each ship that gets sunk. Often, we share some of those embellishments that the other person doesn't have (a baggie of flowers from that big jar, a yard of ribbon from that spool, buttons in a color we've run out of, etc.) and we keep an eye out for really good deals (dollar bins at Target or Michael's, clearance at the scrapbook store, kits in the scrapbooking section, items at Big Lots, etc). Every couple of months, we send a package of little prizes to each other, since we live very far apart. It's been a great way for the two of us to feel like we're scrapping together, even after I moved so far away from her.

Our game is always evolving. Change it so it fits you best.

A couple rules we came up with
* We can only mark off 3 spaces for each project.
* We cannot mark spaces that touch each other for the same project.
* Boards are subject to "approval" -- no rewards for using adhesive! :)

The way we've set it up, it takes a long time to play. You could probably come up with a faster way to play at a crop or retreat.

Happy Scrapping!

Tuesday, January 13, 2009

Tuesday Tip -- Wire Cubes

It's that time of year when everyone tries to be "more organized." How many of you put that on your list of resolutions? How many of you didn't because it was too daunting?


I had a friend one time tell me that she didn't want to spend any money on organizing tools for her scrapbooking space because it would mean less money to spend on supplies. I can understand that!! Especially in this economy, people all over are looking for inexpensive solutions to the ongoing dilemma of how to organize your things.


Someday, when we finally buy a house and I have a full time job again and we can afford to splurge, I'll pick out the perfect scrapbooking furniture and organizational tools. Being that we have lived in 5 different homes since I started scrapbooking, I needed to have versatile organizing tools that would work in very different kinds of spaces.


Tuesday Tip -- Wire Cubes

I love these things for their versatility. I've been able to do so many different things with them!

Here's how I have them set up right now. I've got two sets that I bought years ago at a Big Lots store. I think they were 10 or 15 dollars per set.

See the extra shelves and vertical dividers? If you buy those zip ties from a home improvement store, (you know, they use them to hold cords together and stuff) you can tie some of the wire squares in the middle of a cube. It works great to really use the space thoroughly.


When I first bought them, I put 4 cubes together and then used the left over squares to make horizontal shelves for a paper rack. Much more economical than buying paper racks that may or may not fit in the next space.


Notice the canvas totes? Joann's sold me those. They fit perfectly and can hold 12x12 items. I used to have piles of stuff in them, but as I get better and better organized, I've been able to reserve them for special projects. This way, I can keep all the special stuff together in one space, then when I'm ready to work on it, I can move the tote . I'm storing items to make a felt pocket advent calendar, and a board book collection project in the other. They're going to be gifts, but I can't say for whom ~ they may read this blog!


One feature I really like is the ability to hang things with book rings off the sides of the cubes as well. I used to put all my ribbon and fibers on little embroidery floss cards and hang them on the sides. You can even put your decorative-edged scissors through the holes in the top for a handy organizer. Need a way to hold ribbon spools? Rest a dowel between the sides. You could get several dowels in one cube.

Having moved many times, these cubes have been a great addition to my space. I was able to make a really tall skinny tower once. I was able to make a low row of cubes under a window. I can have thin shelves or large cubes. It fits 12x12 paper easily. It all comes apart and fits into a tote bag or box when we move.
So if you're looking for an inexpensive, versatile, easy way to store your things, think about trying wire cubes.
Happy Scrapping!

Tuesday, January 6, 2009

Tuesday Tip... Ribbon Organizing

I've been trying to decide how to organize my ribbon for a while now. I started with some of the cropper hopper ribbon drawers, but quickly outgrew them. I saw the Lisa Bearnson rail system, but too expensive. I saw several containers with holes in the sides, but would've needed many of them to fit my current collection. I saw a lazy susan thing with 3 posts sticking up. I had at one point taken most of my ribbon off their spools and put them on plastic cards like for embroidery thread, but bigger. Unfortunately, that left my ribbon with lots of kinks and wrinkles.


Then I saw Fiskateer Lisa Pizza's example of how she decorated her scrap space and started thinking... You can see a video of her idea that inspired me on her blog La Femme Papier


As money is tight all over the country, I hope you'll all appreciate my cheap and easily expandable ribbon organizer. The whole thing cost me about $20 and I could expand it for less than a dollar! I have a friend who's neighbor uses a lot of ribbon in her baking business. They're collecting empty ribbon spools and sending them to me for the rest of my ribbon collection (only 1/2 of it is on the wall at the moment). You may be able to find a store or other business that would do the same for you if you need it.


Tuesday's Tip: Inexpensive Ribbon Holder


(only 1/2 my collection so far)


Supplies needed:


1 curtain rod kit with wall brackets (got mine for $10)
1 package (minimum) curtain clips (found 10 for $5)
wooden dowels (make sure they fit through your ribbon spools, but aren't too thin and week (less that $1 each)
16 inches of ribbon for each dowel (used my stash)
paint and brush (already owned)
Optional: tape to hold down ribbon ends on the rolls (I used blue painter's tape)


Paint the dowels - try one half at a time and let dry before doing the other half


Cut ribbon into 8 inch sections, fold in half, and clip the ends so it makes a loop


Install the curtain rod on the wall, hanging 2 curtain clips on it. Hang dowel from the ribbon loops. Add more levels as needed for your collection. Slide ribbon rolls on the dowels. They're easy to take down and put back up.


Now I've got all this extra space where my ribbon used to be. WooHoo!

Happy Scrapping!

Monday, January 5, 2009

Tune in tomorrow....

Tune in tomorrow for my new feature: Tuesday Tip! I've got a really good one for you!

I know it's been FOREVER since I posted... well, a couple weeks feels like forever. We were much busier this holiday season than I had expected to be. We ended up going to 2 parties, staying overnight in another state for a family gathering, and stopping by a good friend's home for several hours, all for "holiday week."

Plus, I've been trying to reorganize my scrapping space, but it's been slow going. I'm not very motivated to do this. I was supposed to get a "hand me down" table when my parents came to visit and I had totally mapped out how I was going to redesign the space. Unfortunately, it wouldn't fit on the trailer with all the other furniture they brought us. It's been hard to rethink the space without the table. I won't be getting the table until at least next summer, so I've got to do something with what I have.

I can't work on my craft projects until I get my space done, so I have to keep going. You'll still get a great tip tomorrow. Here's a hint -- I designed a way to organize one type of craft supply and it was very inexpensive!!

My blog resolutions for this year:
1. Tuesday Tips. I want to put up a "prudent" tip every Tuesday.
2. Weekly Crafternoon. I want to post a craft project at least once each week.

Come back tomorrow for your Tuesday Tip!!